


Best Lighting for YouTube Videos
Rent film gear from local filmmakers.
Rent film gear from local filmmakers.


As a video creator, there is a lot to think about when putting together a YouTube video. You’ll need to find the best camera for your YouTube video, get a good quality external microphone, plan interesting content and, last but not least – nailing your lighting.
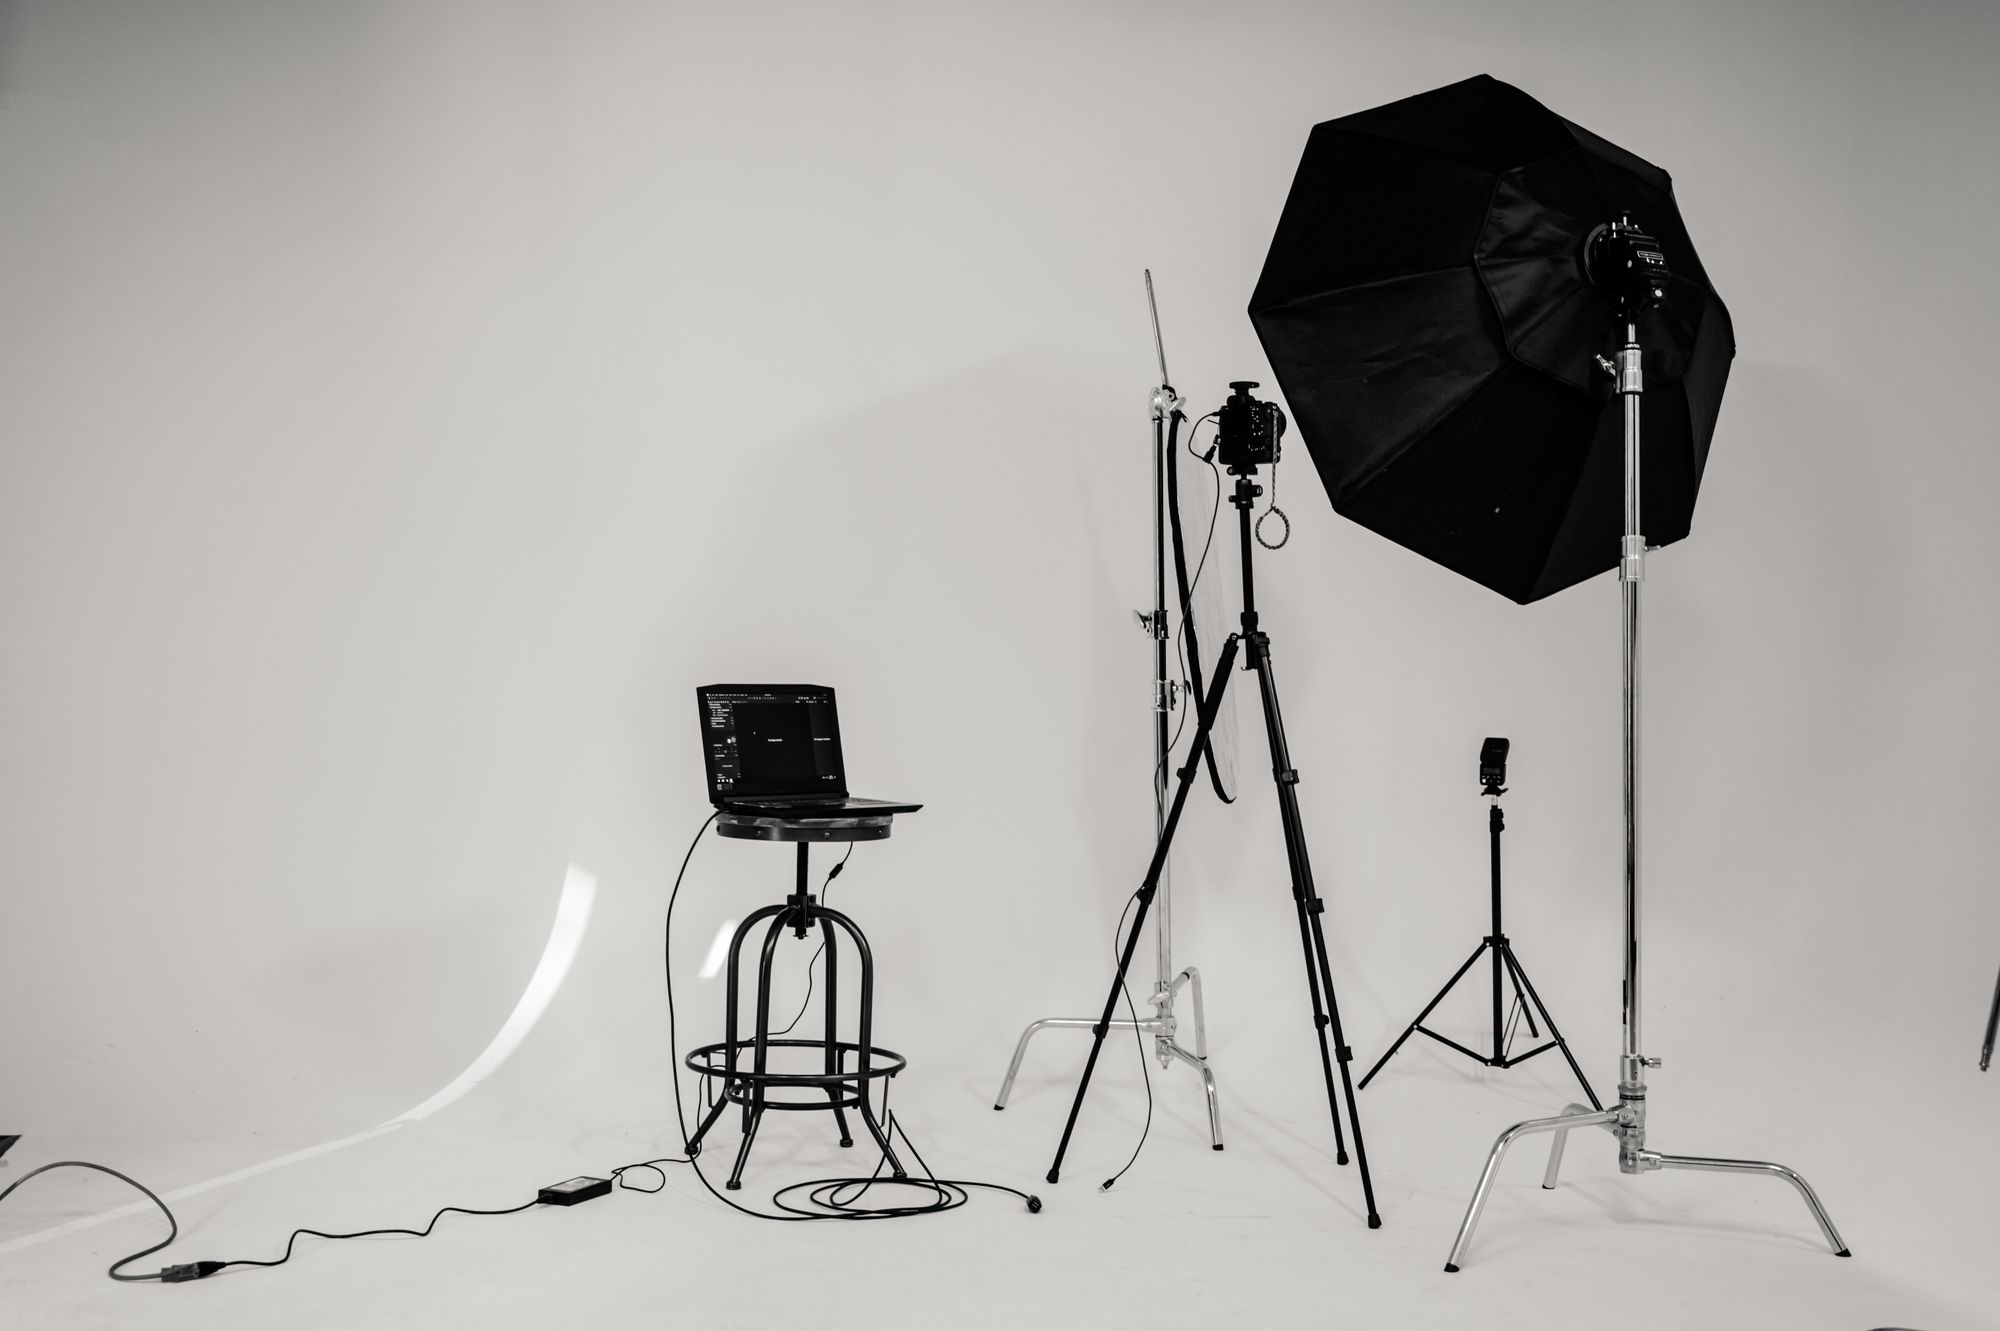
When choosing your lighting setup, it's important to find equipment that fits the purpose of your YouTube video, the message you want to convey, and your level of expertise.
Looking to rent lighting equipment for your next YouTube video? In this guide we'll tell you what you need to know before deciding on the best lighting equipment and what to do with it once you find it.

- Commonly used in photography – and filmmaking
- Perfect for a natural look – flattering and warm
- Commonly used in photography – and filmmaking

- Key tool in a photographers kit – easy to use
- Affordable lightsource – and very portable
- Provides a more directional light – gives a polished look

- The ideal lighting setup – and easy to use
- Commonly used in portraits, glamour shots – and illuminates
- Great for close-up shots – whether photography or video

- Incredibly efficient – with long shelf life
- Converts more energy – produces less heat
- Gives higher quality images – and is very affordabel

- A photographer's best friend – very versatile
- Quick to unpack and set up – foolproof
- Reduces harsh shadows – and wraps around subjects

- Extremely affordable – and very compact
- magnification – Increases distance between lens and sensor
- Warm interior lighting – and softer up-close lighting
Learn more about:
- Why lighting is so important
- Why lighting is tricky
- How to get the best lighting
- Natural lighting
- Artificial lighting
- Get started: best lighting setup - cheap and easy
- Get better: using a more advanced lighting setup
- Stay pro: achieving your desired look and mood
- Lighting kit
- What’s next
Why lighting is important
Imagine, you're walking into an airplane, you've got your new trainers on, and your hair is on fleek– you're feeling like a superstar. You spot a beautiful passenger sitting in the seat next to you – score!
After a couple of hours, you decide to go for it. Before making your move, you decide, as any decent singleton out there, to check yourself out in the bathroom mirror. Strolling confidently – I mentioned hair on fleek, right?
You get to the aircraft bathroom, lock the door, look in the mirror, and as you turn on the lights, you see… well, no reason to put that on paper. Let's just say you decide not to make a move.
Going in so confident and leaving so timid – what happened? For all you travellers out there, I think you can agree when I say – inadequate bathroom lighting happened!
Even with everything perfect, the failure to secure great lighting for your video can make your video go from awe-inspiring to bathroom horrible, real quick.
And that goes for whether you're doing a regular TikTik dance video or setting up for larger film production.
Why lighting is tricky
Finding the best lighting for your videos can be challenging. Sometimes your shot isn't bright enough, or maybe it's too bright. Sometimes the colour temperature isn't right, or the shadows are so harsh that you can barely see what is what.
Let's say you want to capture a bright and airy-like shot, using direct sunlight as your only lighting will prevent this from happening. And turning on all the lights might still leave you with a dark and grainy looking video.
So, to summarize lighting is one of the most important things, and also one of the most challenging things to get right. Isn't that just kick-you-in-the-crotch, spit-on-your-neck fantastic?
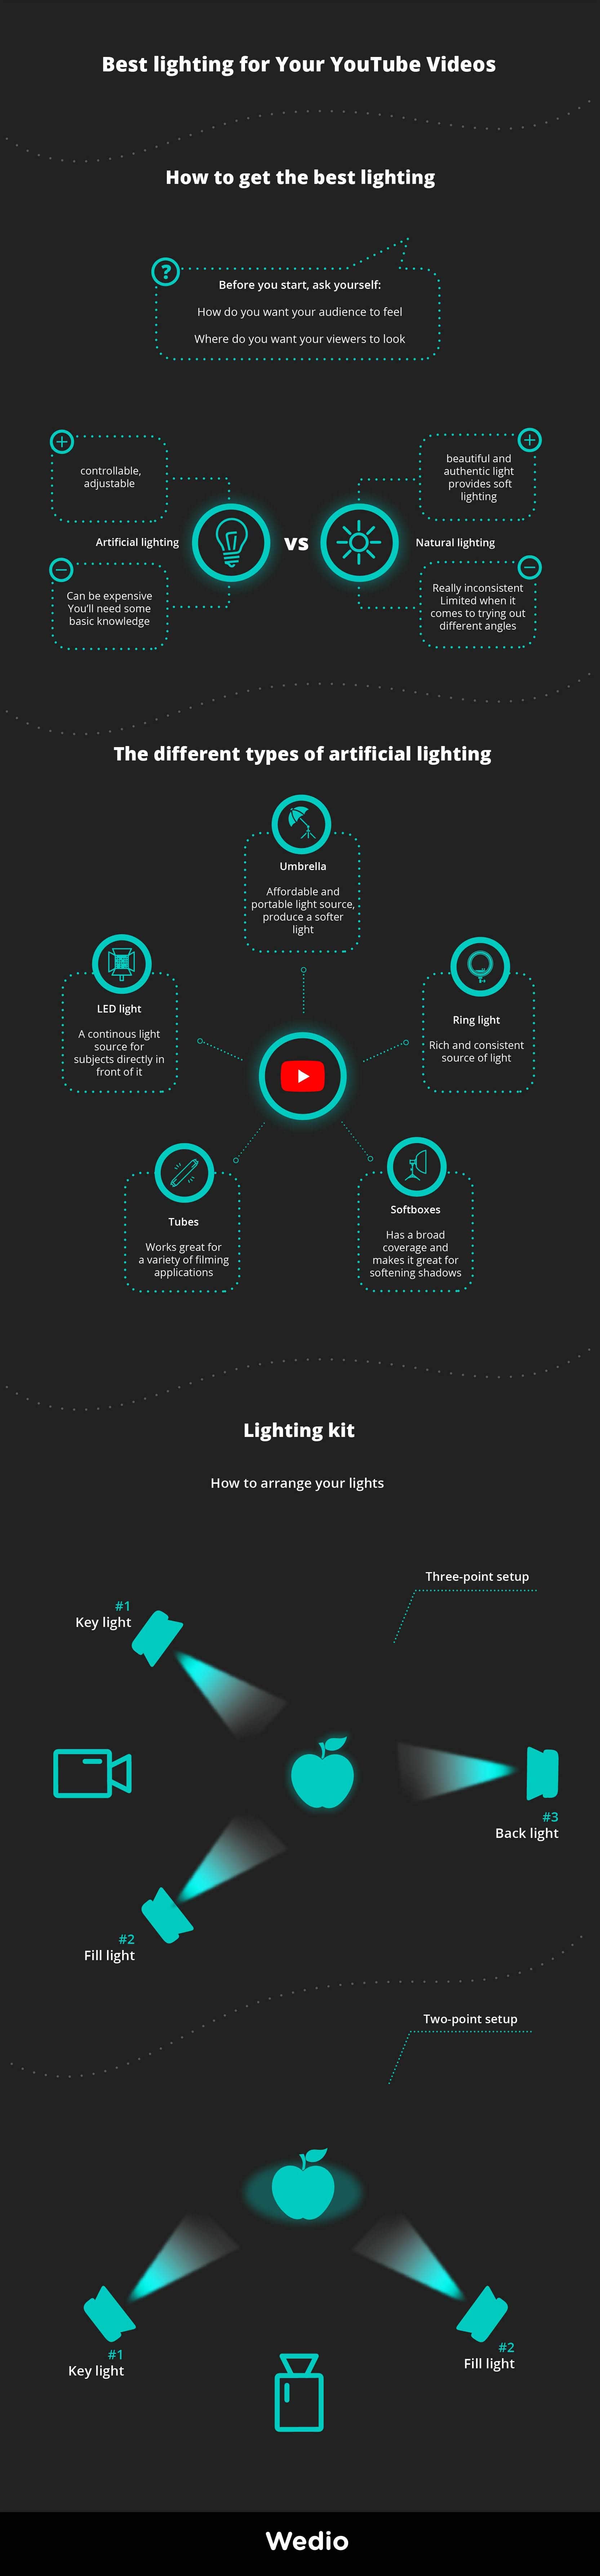
How to get the best lighting
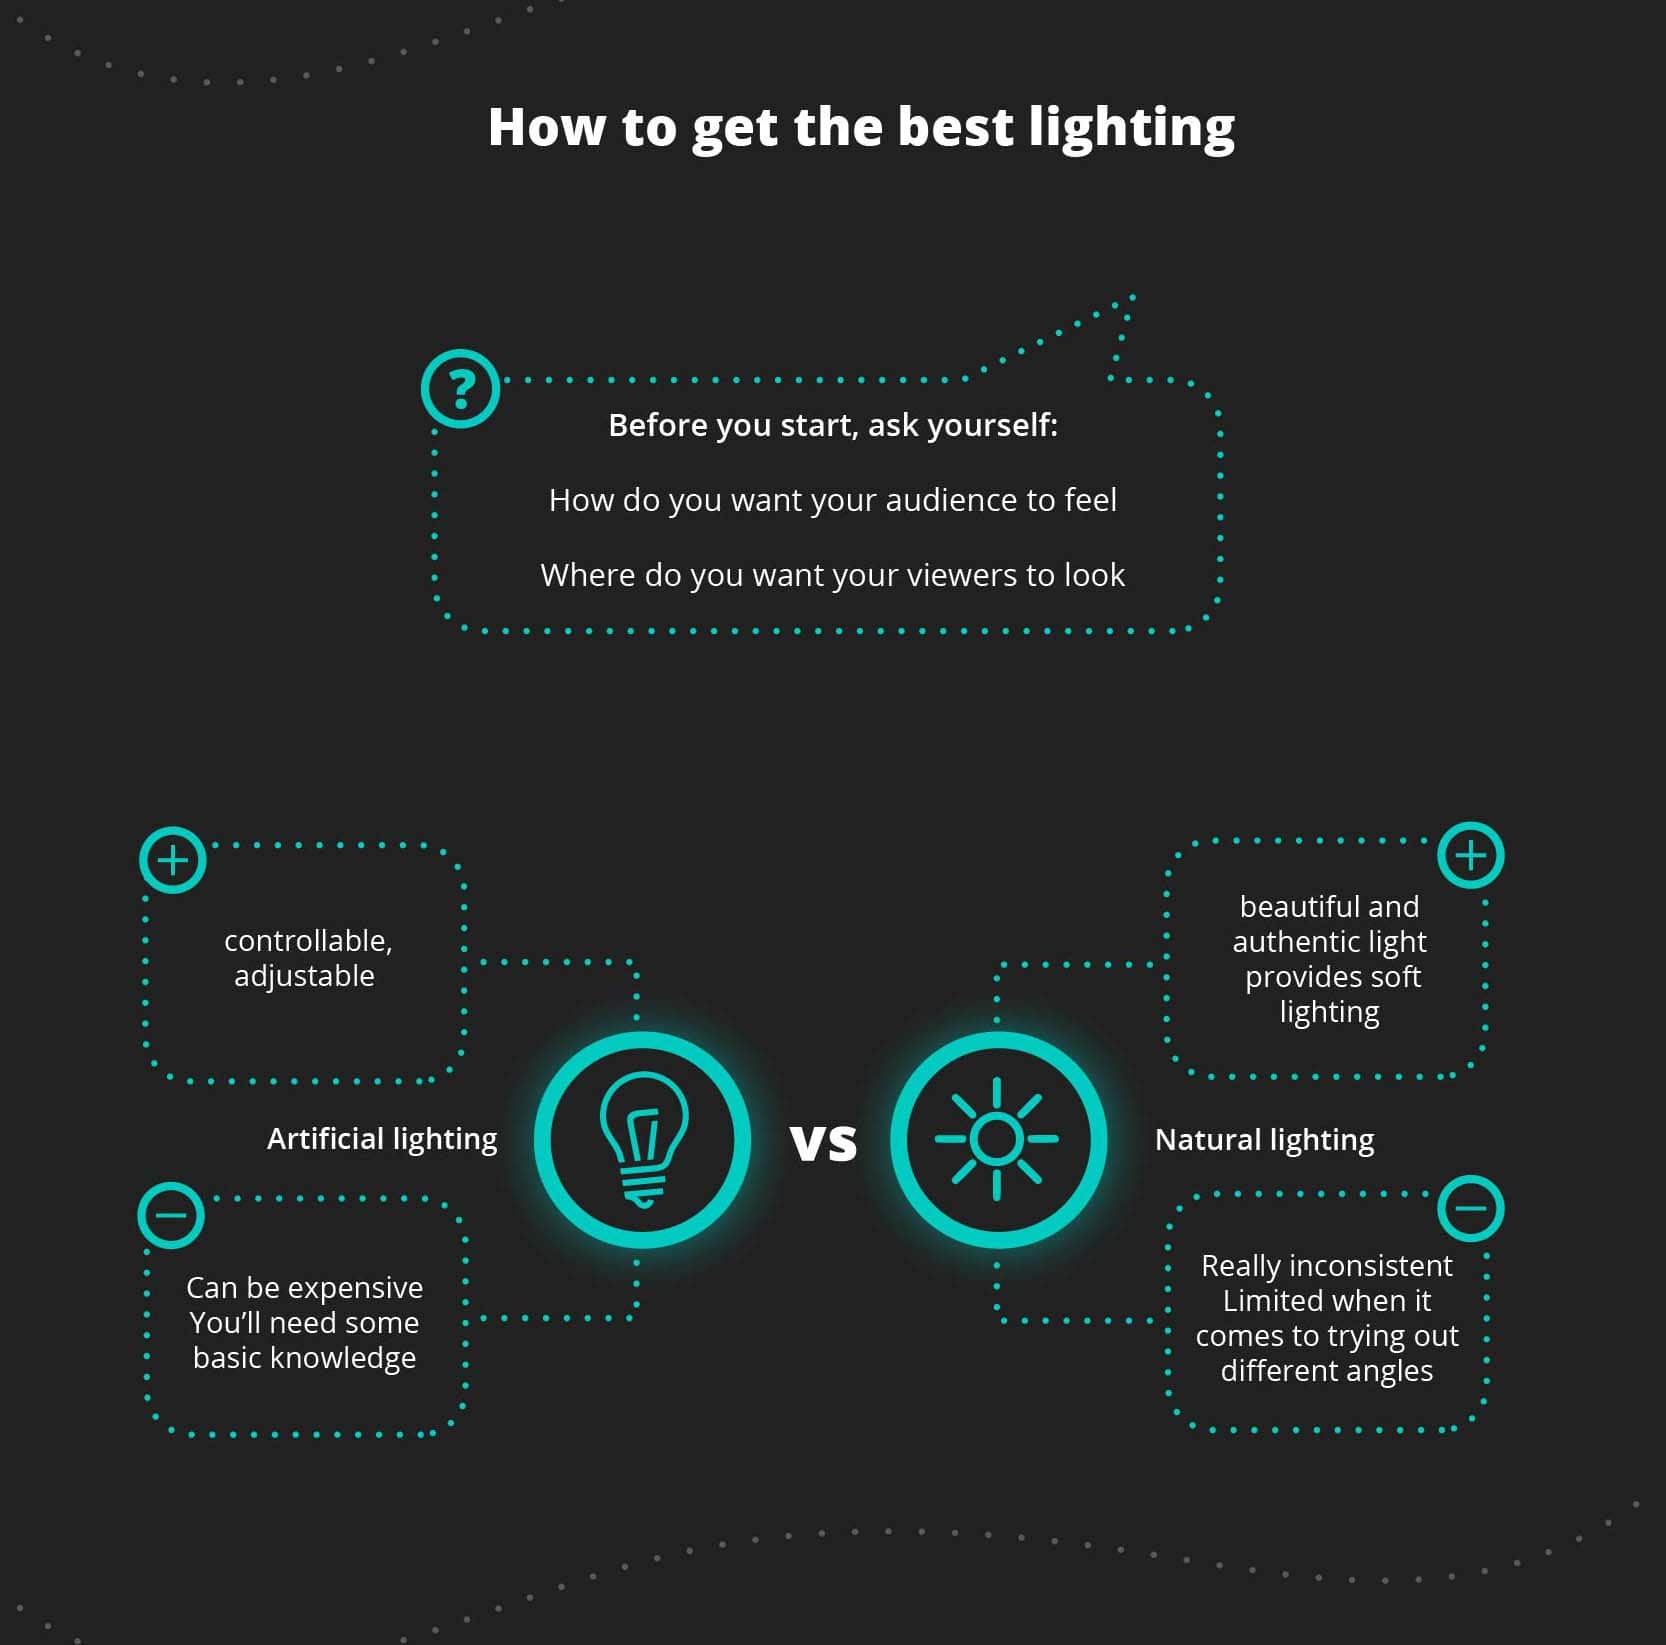
So, how can you get the best lighting for your YouTube video?
You need to single out which desired mood you want to convey and what type of lighting will help contribute to express that specific mood. Before you start your production, you need to ask yourself:
- How do you want your audience to feel?
- Where do you want your viewers to look?
Let's take a look at what types of lighting you can choose between and how to use these different types of lights.
Natural lighting
We all know that while tan-in-a-can is a great alternative, there's nothing that beats that leather-looking skin you get from laying at the beach all day. The same thing goes for your YouTube video.
Using natural lighting from the sun is by far the most beautiful and authentic light you can utilize for your videos. Natural light is notoriously known for providing you with that pleasant soft lighting.
What is soft lighting
- Commonly used in photography – and filmmaking
- Perfect for a natural look – flattering and warm
- Commonly used in photography – and filmmaking
Soft lighting means that it takes a long time for the light to transition into a shadow. As opposed to hard lighting, which is more difficult to control and quickly brings out any wrinkles.
One of the most cost-effective ways to achieve natural lighting (and this might be shocking) is windows. I know, mind-blowing.
Sit close to a large window when creating your YouTube video and face the light head-on for an even exposure. Keep in mind, however, that if the window is flooded by sunlight, the harsh lighting will create dark shadows on your face. You'll also likely find yourself squinting on camera – and yes, it's just as annoying as it sounds both for you and your viewer.
Natural lightings' pitfalls
It's really inconsistent, and it can be difficult to achieve an excellent result – especially if you're working alone. Also, you are kind of limited when it comes to trying out different angles – you are pretty much locked to your seat.
What's more, the weather is constantly changing, so you have to pray that mother earth doesn't suddenly decide for dark and rainy weather. That cute lighting you found yourself in during lunch – might not be so cute by dinner time.
Don't worry, there's a solution to this!
Artificial lighting
Have you ever noticed that regardless of when you enter casino it always looks the same - whether it’s noon or midnight!
It all comes down to lighting! Casinos are perfectly aware of their lighting setup, making sure you'll never know how many hours you have been gambling your savings away. Now, that's smart business!
The thing is, you can do the exact same thing in your YouTube videos – with two magic words: Artificial Lighting.
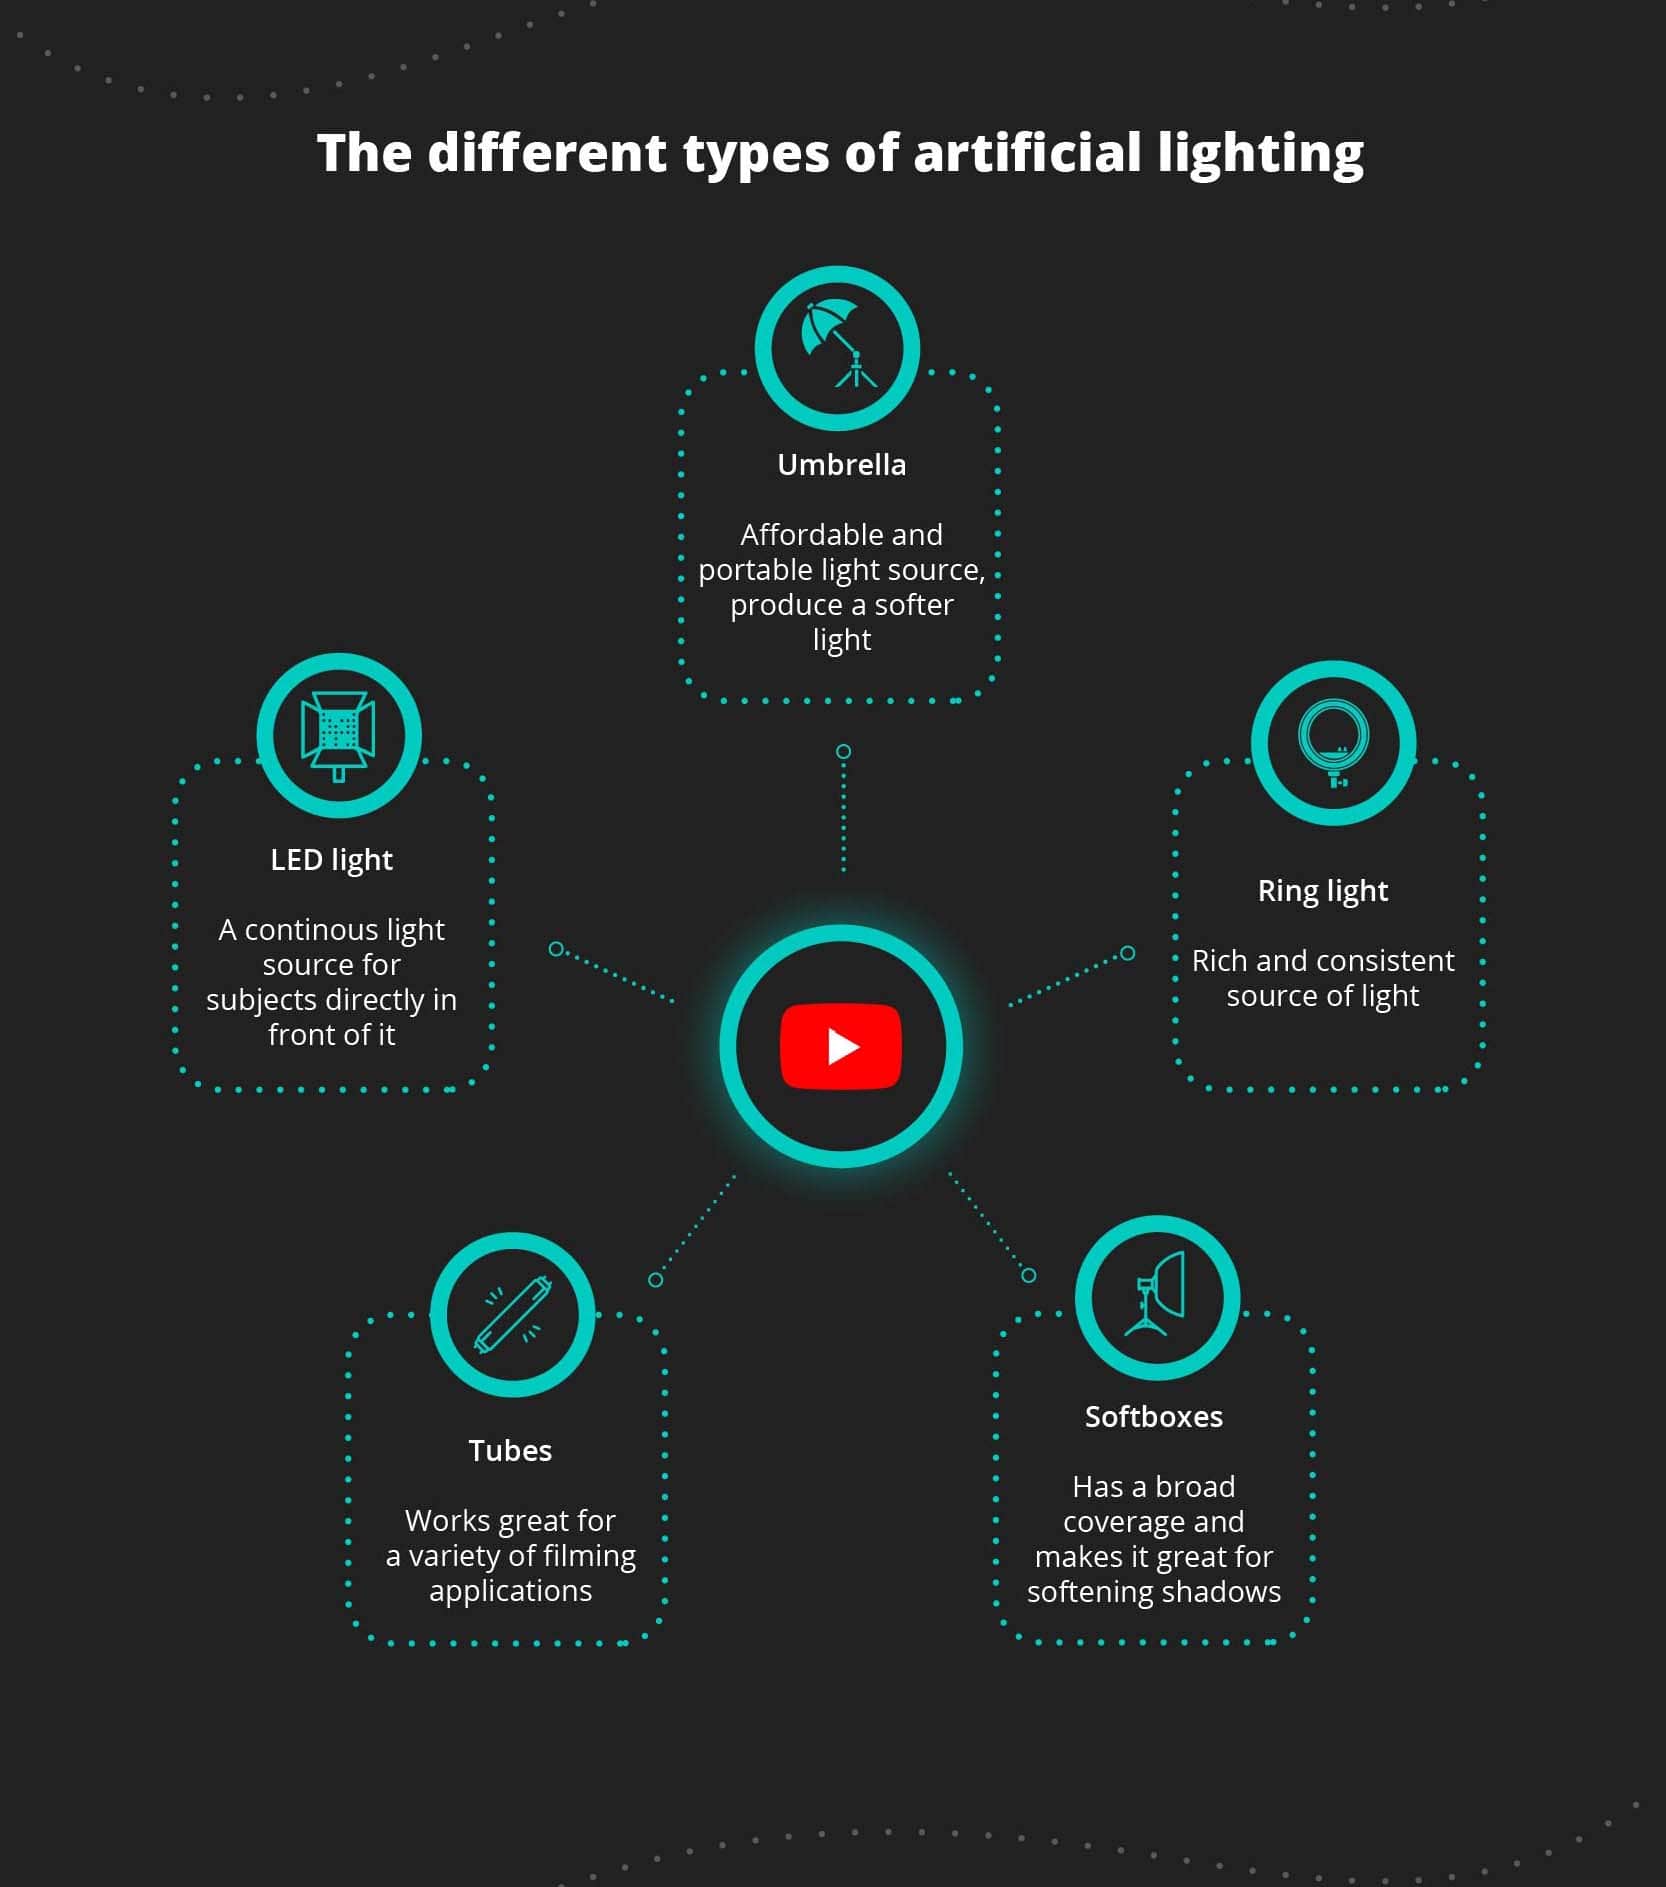
Whether you’re just getting started or already a pro, you’ll need a good understanding of the various types of artificial lighting there is to choose from. This will help you choose the right one.
Let’s go through your lighting options – this will help you decide on the lighting equipment you need for your next YouTube video.
Umbrella
- Key tool in a photographers kit – easy to use
- Affordable lightsource – and very portable
- Provides a more directional light – gives a polished look
No, I'm not talking about the umbrella you use as decoration in your Piña Colada. I'm talking about the umbrella you use as a lighting source for your YouTube video.
Umbrella lights are an affordable and portable light source. They produce a softer light than many of their counterparts.
What's great about umbrella lighting, is that it provides a more directional light allowing you to achieve a polished look for your YouTube video. At the same time, it gives any room a fair distribution of light. On top of that, they are easier to use than other lighting setups.
There exist two kinds of umbrellas:
- Bounce umbrellas (black and silver): Consist of two parts, a reflective inner surface that bounces the light towards a subject and an opaque outer material that keeps the light from passing through the umbrella.
- Shoot-through umbrellas (white and translucent): Diffuses the light and hits the subject more softly.
Ring light
- The ideal lighting setup – and easy to use
- Commonly used in portraits, glamour shots – and illuminates
- Great for close-up shots – whether photography or video
A ring light is exactly what it sounds like. It's a lighting source shaped like a ring – imagine a giant glowing doughnut. Not a bad idea actually – you're welcome Dunkin' Donuts.
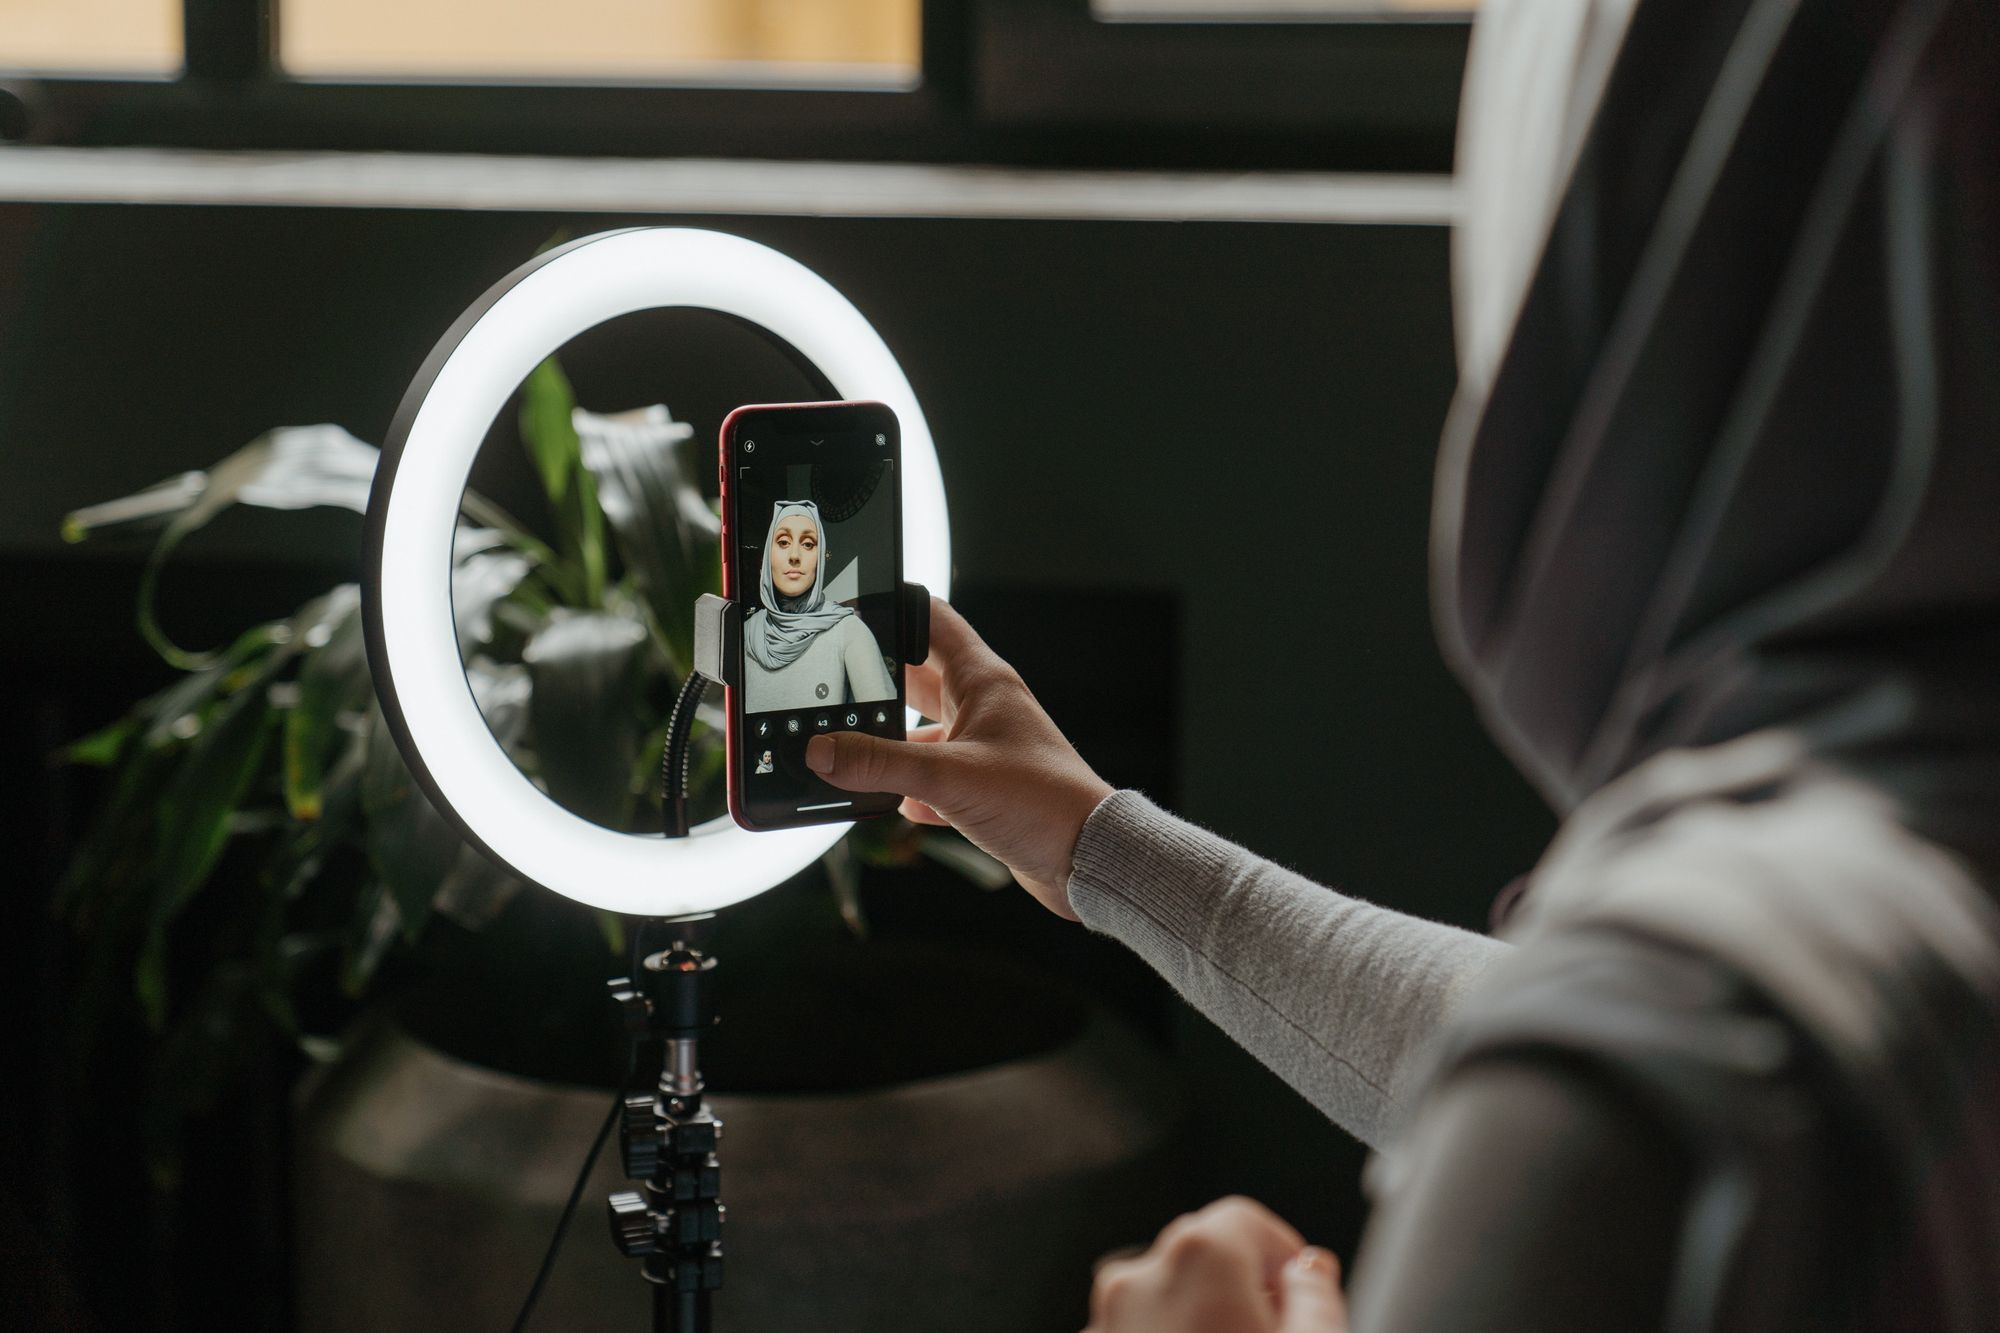
Choose ring lighting if you want a rich and consistent source of light. It's the ideal lighting setup to choose for illuminating your face, as it creates an even light around your face while cleaning your face of any possible shadows. A ring light will provide you with a truly flattering light source for a wide range of shooting environments.
Hint hint – All you beauty vloggers out there – this is the lighting source for you. Choose ring lighting and get your "Princess Leia hair tutorial" out there.
For the best lighting effect, place both your camera and ring light in front of your subject at face level. However, don't shy away from playing around with it, you can try placing the ring light to the side for a more dramatic look. Maybe position it underneath if you're creating scary storytelling effects. No, but really – have fun with it, I promise you, it won't kill you.
LED light
- Incredibly efficient – with long shelf life
- Converts more energy – produces less heat
- Gives higher quality images – and is very affordabel
The most popular LED on-camera lights are square and rectangular. You will typically see them mounted on top of a camera. It functions as a continuous light source for subjects directly in front of it. If you are going for a more creative lighting look, try to mount them on a stand instead.
Suppose you want to document your adventurous trip to the Philippines. In this case, it is the perfect type of lighting for you to choose, as it's battery-powered and portable, making it the ideal companion for on-the-go recording.
They also work great as indoor lighting, that is if you want a more affordable option than light modifiers.
Using LED lights as your key light and combine with a big diffuser - voila! You've just achieved the perfect soft natural looking shadow. Didn't I tell you, there are great artificial options!
Softboxes
- A photographer's best friend – very versatile
- Quick to unpack and set up – foolproof
- Reduces harsh shadows – and wraps around subjects
A softbox is like the Starbucks around the corner. It's the perfect go-to, it's delicious, and it will give you that street-cred you're looking for, nice!
A softbox works perfectly for product reviews, cooking shows, room vlogging and interviews. This is thanks to its beautiful, soft light, that wraps around the face. Its broad coverage makes it great for softening shadows and lighting up the area it's placed in.
A softbox is a translucent box, available in different shapes, sizes, and even different colours. Most often, however, you'll see a rectangular softbox, making it the perfect lighting setup to imitate the natural light coming from a window.
You can choose different setups for your softbox, depending on what look you want your video to have. If you're going to add a dimension to your set – place it at a 45-degree angle. If you want to eliminate shadows – use two on each side of your setup. Get where I'm going? It's ok to experiment with your softbox, try out different setups to get your desired look and mood.
Know that using a softbox requires more control than, for example, using umbrellas. A softbox does require more usage knowledge and an experimental approach. On the other hand, you'll also be able to achieve the specific look you're aiming for.
Tubes
- Extremely affordable – and very compact
- magnification – Increases distance between lens and sensor
- Warm interior lighting – and softer up-close lighting
Yes, that’s right – tubes! You know those long bulbs, the office you work at uses in the bathroom or the ones your grandma has mounted in her storage room? Yep, that’s the ones.
You might never have thought about using tubes as a lighting source for your videos, but they can actually work as a great alternative lighting source. In fact, tubes work great for a variety of filming applications, including creating warm interior lighting or softer up-close lighting for the subjects.
Usually, those larger studios, that don’t have a tight budget to work with, typically use large softboxes or big reflective umbrellas in order to achieve that desired soft lighting. But you can do just that with tubes as well (that’s a pretty crazy scoop).
When talking about tube lights you’ll most often hear the word Fluorescent lighting. Sound familiar? That’s because that’s the type of artificial lighting you create when laying multiple tubes next to each other, so my guess is, as the video creator you now are, you’ve heard the word before but might never have known exactly what it meant. Now you do! What can I say – I’m here to please.
What’s so awesome about using fluorescent lighting is that it’s extremely inexpensive and easy to build. I don’t exaggerate when I say that you can probably choose your favourite BigMac meal (the double quarter pounder, of course) or buy tube lights – the amount spent will be the same.
Tubes' pitfalls
Of course, I’m not going to lie there are pitfalls to using tubes. Firstly, they are not as versatile or efficient as LED lights. Typically, you’ll find tubes hanging from the ceiling or screwed into something.
This means there’s no easy way to get them in the exact position you want for your video. Perhaps, if you’re in a “Bob the Builder”-kind of mood you could mount the tubes to a piece of wood. Also, they have a light cycle (no, don’t even go there – tubes don’t have PMS), which means they will change in brightness and colour as you’re using them.
Get started: Best lighting setup – cheap and easy
As I mentioned above, getting the lighting in your video is a tricky process. So, if you’re new to the “lighting universe” you might want to ease into it. I’m thinking – it’s feasible to state that as a beginner in setting up lighting, that specific style and how you want to portray yourself or your subject might not have been completely settled, just yet.
This means you don’t want to spend all your money on lighting equipment you might not even use because it doesn’t create the mood you were trying to convey. No, no – if you’re just getting started you want some easy-to-use and affordable lighting equipment.
To make your lighting setup as easy to navigate as possible, we gathered some of the easiest and cheapest lighting options. Whether you’re looking for just a single piece of lighting equipment or a lighting kit we’ll cover you can find the equipment just right for you.
Get Started

- extremely Compact – and portable
- Dimming – 0 to 100% stepless, via on-light controls
- Colour temperature – 2700 to 6500K

- Very versatile – and robust
- Power supply – 230 V AC, 50 Hz
- COLOR TEMPERATURE – 2800 to 6500 K

- Incredibly versatile – and easy to use
- Power Source – 110 to 240V AC
- Color Temperature – 2700K to 6500K
Get better: Using a more advanced lighting setup
If you’re already familiar with the different lighting kits and you’re ready to take on a more challenging role when dealing with lighting, you need the gear that will take you there and help you up your game.
As you evolve and grow your YouTube channel your lighting equipment will need to evolve and grow as well.
Once again we have gathered the best and most relevant lighting equipment for you as you’re continuing to develop your lighting setup skills.
Get Better

- Extremely compact – and easy to use
- power supply – 100 to 240 VAC
- Color Temperature – 5600K

- Remarkable light output – and practical size
- Color Temperature – 5600K
- Frequency – 2.4ghz

- Extremely versatile – suitable for videography and photography
- Power Supply – AC 100 to 240V 50/60Hz
- Color temperature – 5600K

- Amazing quality – with upgrades and improvements
- Color temperature – 5600K
- consumes 180w – while outputting 135,000 lux
Stay pro: Achieve your desired look and mood
So, you have been working as a YouTuber video creator for a while now, and that whole lighting show – you got it covered!
This means that you’ll also want to upgrade your lighting with the best lighting equipment on the market. Keep in mind, that the best possible equipment also comes with a different price tag then the ones you have seen prior – because only the best of the best is good enough for you.
That’s why we gathered some of the best lighting equipment for shooting your YouTube video:
Stay Pro

- Refined functions – and advanced connectivity
- Color temperature – 5500K
- Consumes 350W – while outputting 3500 lux

- Extremely high quality – and very portable
- Power Supply – AC100~240V 50/60Hz
- Color Temperature – 5600K

- Extremely good quality – and easy to use
- Color Temperature – 5600K
- Power supply – DC48V/12.5A
If you’re still thinking about whether you should use the Aputure 300d, the Neewer 14” ring light or a third for your next YouTube video and not really ready to settle on specific lighting equipment yet – we get it! And that’s okay.
You don’t have to settle on only one specific type of lighting equipment or one type of kit you can mix it up as you please depending on what type of video you’re creating.
Lighting kit
You know what types of lighting options to consider. Now, you also need to think about how you arrange your lights.
Turning on a bulb, aiming it towards your subject, and hoping it will give you the desired look, is basically the same as climbing a mountain in the Alpes wearing flip-flops and hoping you won't freeze to death.
You need to have some basic skills when it comes to your lighting setup. For this reason, I've gathered the need-to-know items when it comes to lighting setup.
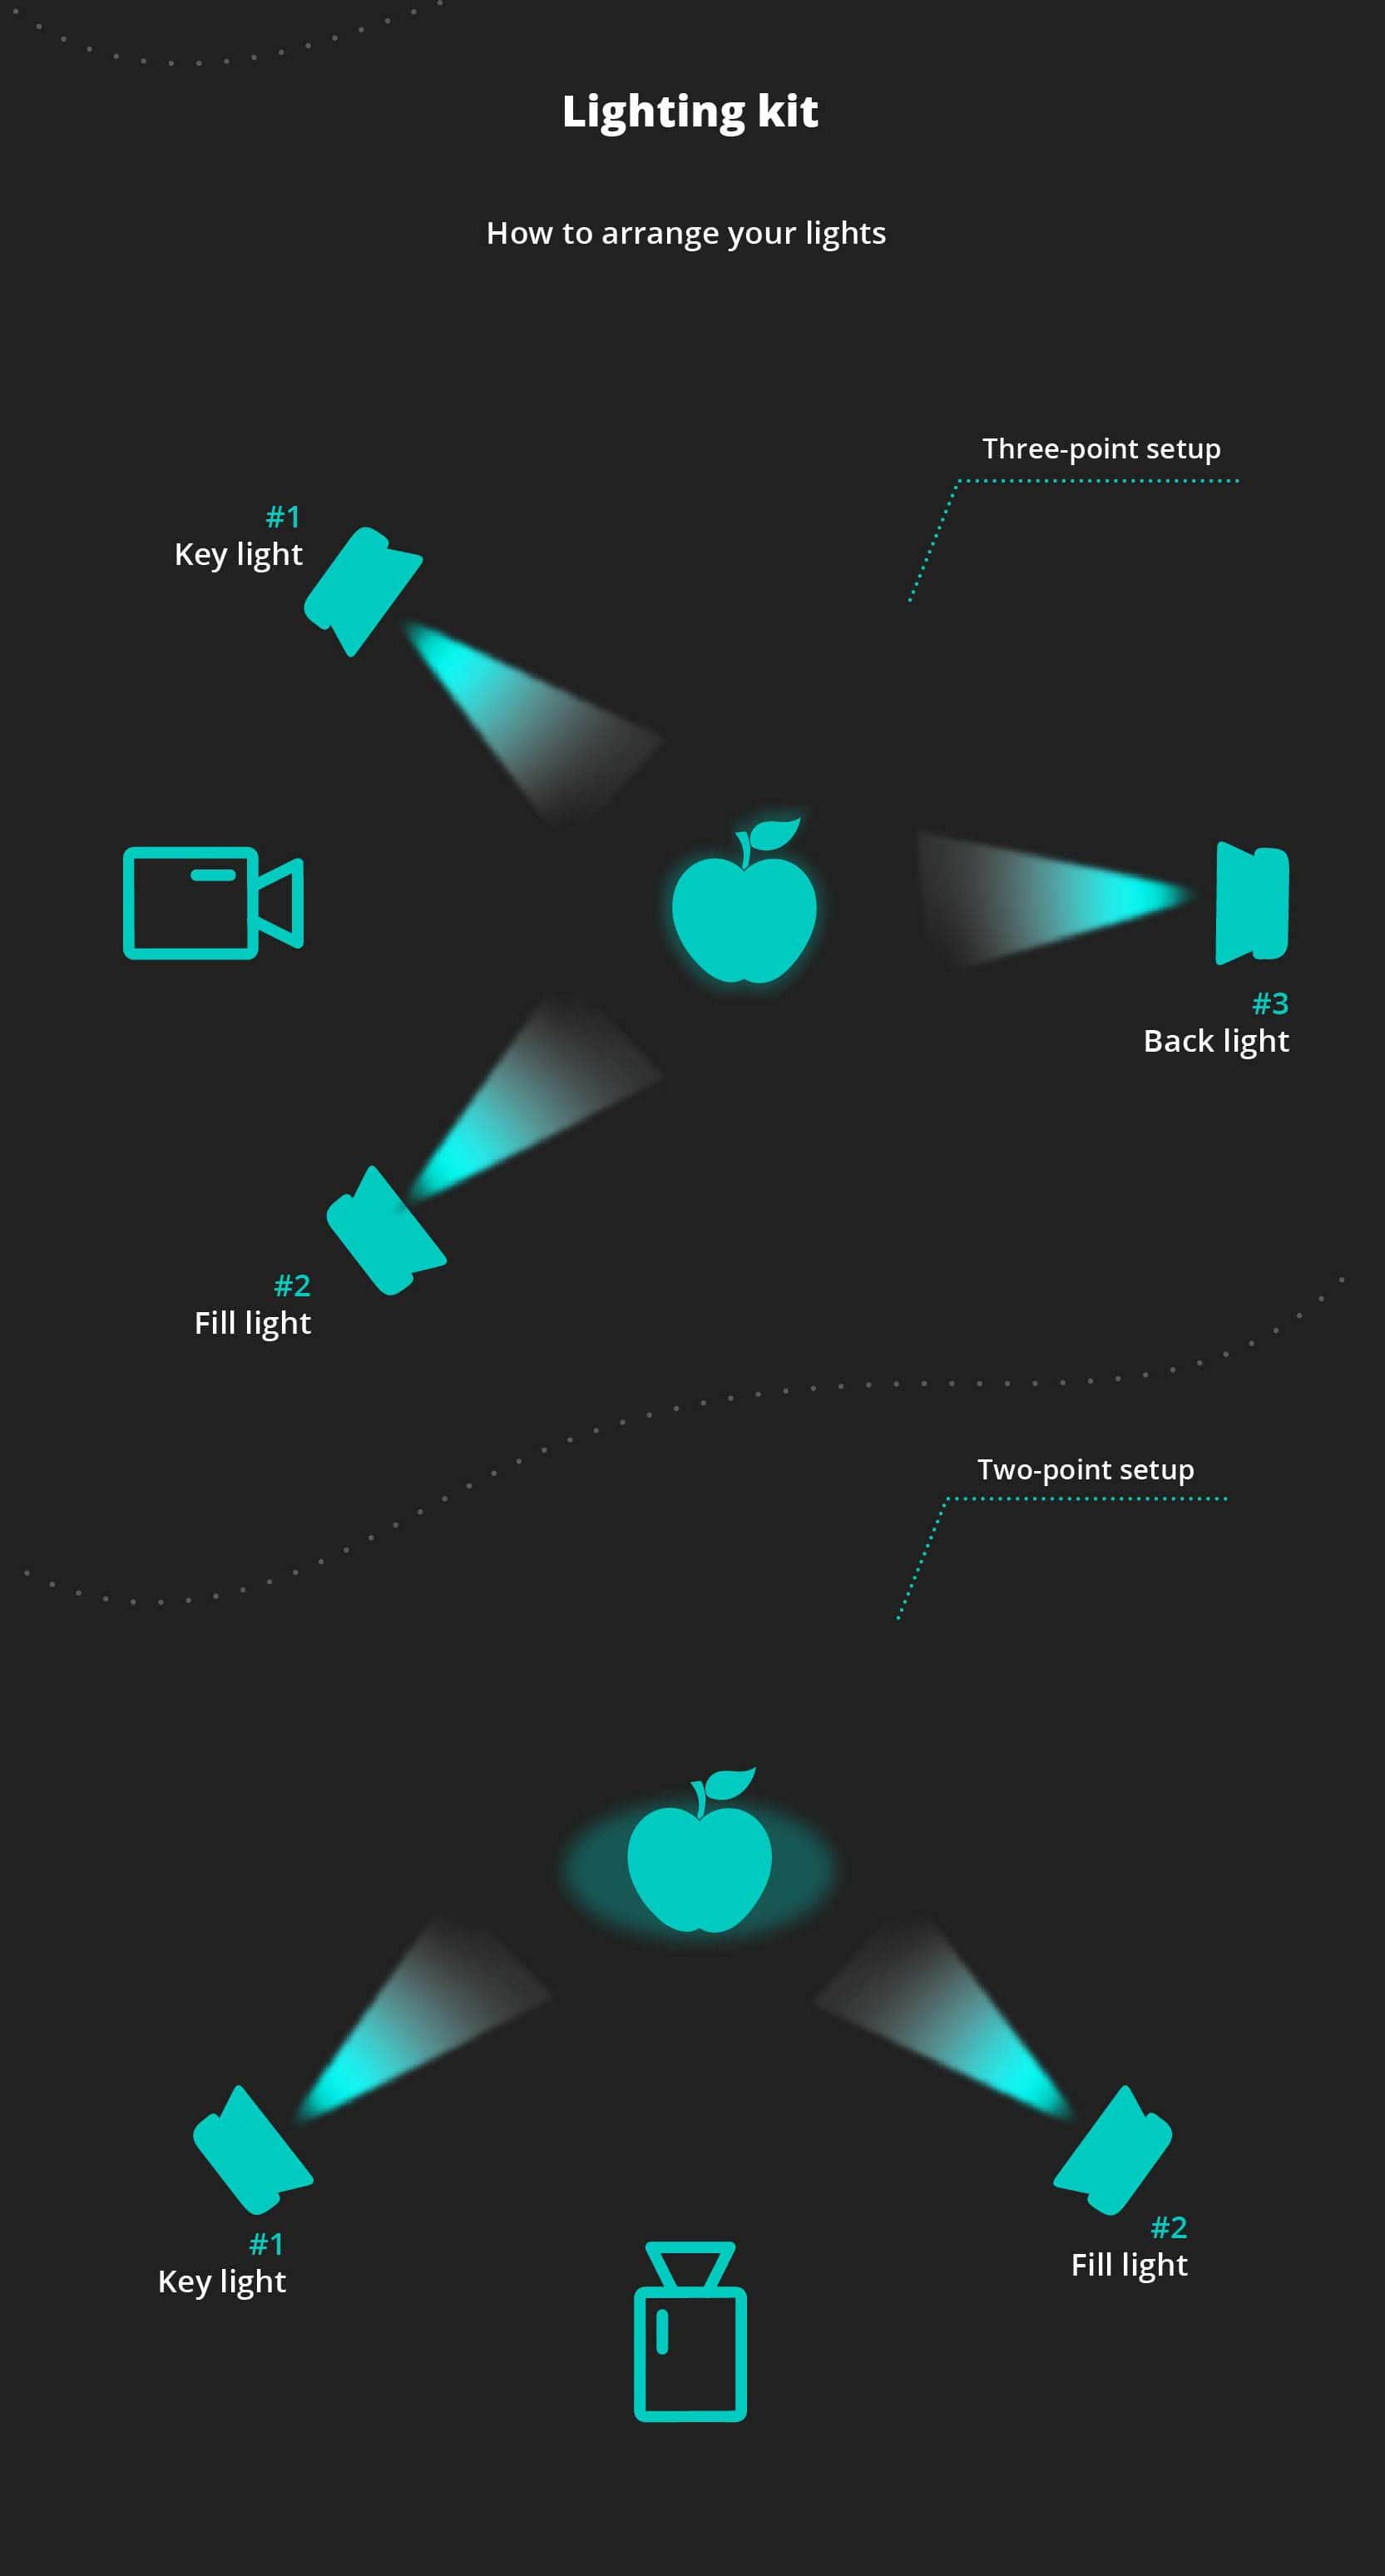
While there are numerous lighting setups, ranging from a single light to as many as you can possibly get your hands on. There are two specific lighting setups that come to mind: two point and three-point lighting setups.
So, let’s go through what these lighting are all about.
The most popular and often used is the three-point lighting setup. This consists of:
1. Key Light This is your primary and stronger light. The aim of your key light is to have it pointing towards your subject's face.
It is vital to put the key light closer to your subject's face than any of the other lights. If adjusting the distance isn't possible, then you need to make the key light stronger by increasing the output. It will also be a good idea if you put it slightly above the level of your subject's face.
2. Fill Light The fill light's role is to fill the shadows which your key light is now generating. The fill light will soften them up and make them look more natural – know that the point of fill light isn't to get rid of those shadows completely, but rather to create a more natural look.
Your fill light shouldn't be as bright as your key light, you should reduce its intensity to ensure your subject's face doesn't look flat.
3. Background light Using background lighting will separate your subject from the background while creating depth and also ensuring a flat looking shot won't happen.
It might be a given with the "background" name and all. You'll need to place your background light in the background - an easy one to remember.
Using backlight will create an artistic and cinematic feel – just remember it's not a need-to-do but rather a nice-to-do. So, if you're already confused by all the different light options and different setups, just stick to the necessary and easy lighting setups.
Choose a lighting setup
So, if you’re up for trying out the three-point lighting setup, you could try to rent the complete LED 3 point lighting kit: Aputure Amaran 528.
If you on the other hand, rather prefer to stick to the necessities or just not in a particular mood to experiment with adding a backlight - you just stick to the key light and fill light – by which you’ll be using the so-called two-point lighting setup.
A two-point lighting setup will also work great as it will provide you with a beautiful soft light with faint shadows and glorious catchlights.
If the two-point lighting setup sounds more like the way to go for you, you can try to rent the Neewer 2 pack dimmable bi-colour.
What now
So you decided to rent one of the lighting options and experimented with the different lighting setups. Now what? You probably want to know how everything falls into place.
Don't worry, it isn't that difficult.
First, using lighting will naturally create some shadows. Learn how to deal with those shadows.
Remember, there are no good or bad shadows, there's just appropriate lighting for what you want to communicate. If you're doing a "how to become friends with Willy Wonka", you don't want to have a look-a-like session with Freddy Krueger.
The secret to working with different lighting techniques and setups like a pro requires a lot of trial and error.
Once you get it right, memorize it. That way, you'll have it ready and easy to replicate for your next YouTube video.
Rent lighting from local creators.
Save up to 40%.
Global Coverage included.
https://images.unsplash.com/photo-1478826160983-e6db8c7d537a?ixlib=rb-1.2.1&ixid=MnwxMjA3fDB8MHxwaG90by1wYWdlfHx8fGVufDB8fHx8&auto=format&fit=crop&w=3270&q=80
https://www.wedio.com/en/rent/lighting


